
Ride a workout on the trainer
Ride a coach workout, one of 104 ready-made rides, or a free ride, then save it.
Updated 4 November 2026
On the trainer you choose a workout in the lobby’s Workout tab, ride it on a 3D course with your trainer’s resistance following the targets, then save the ride to Form. This article covers the four things you can ride, how to pick them, what the ride screen gives you, how to pause and finish, and where the ride ends up. If you have not paired a trainer yet, start with “Set up the trainer”.
What you can ride
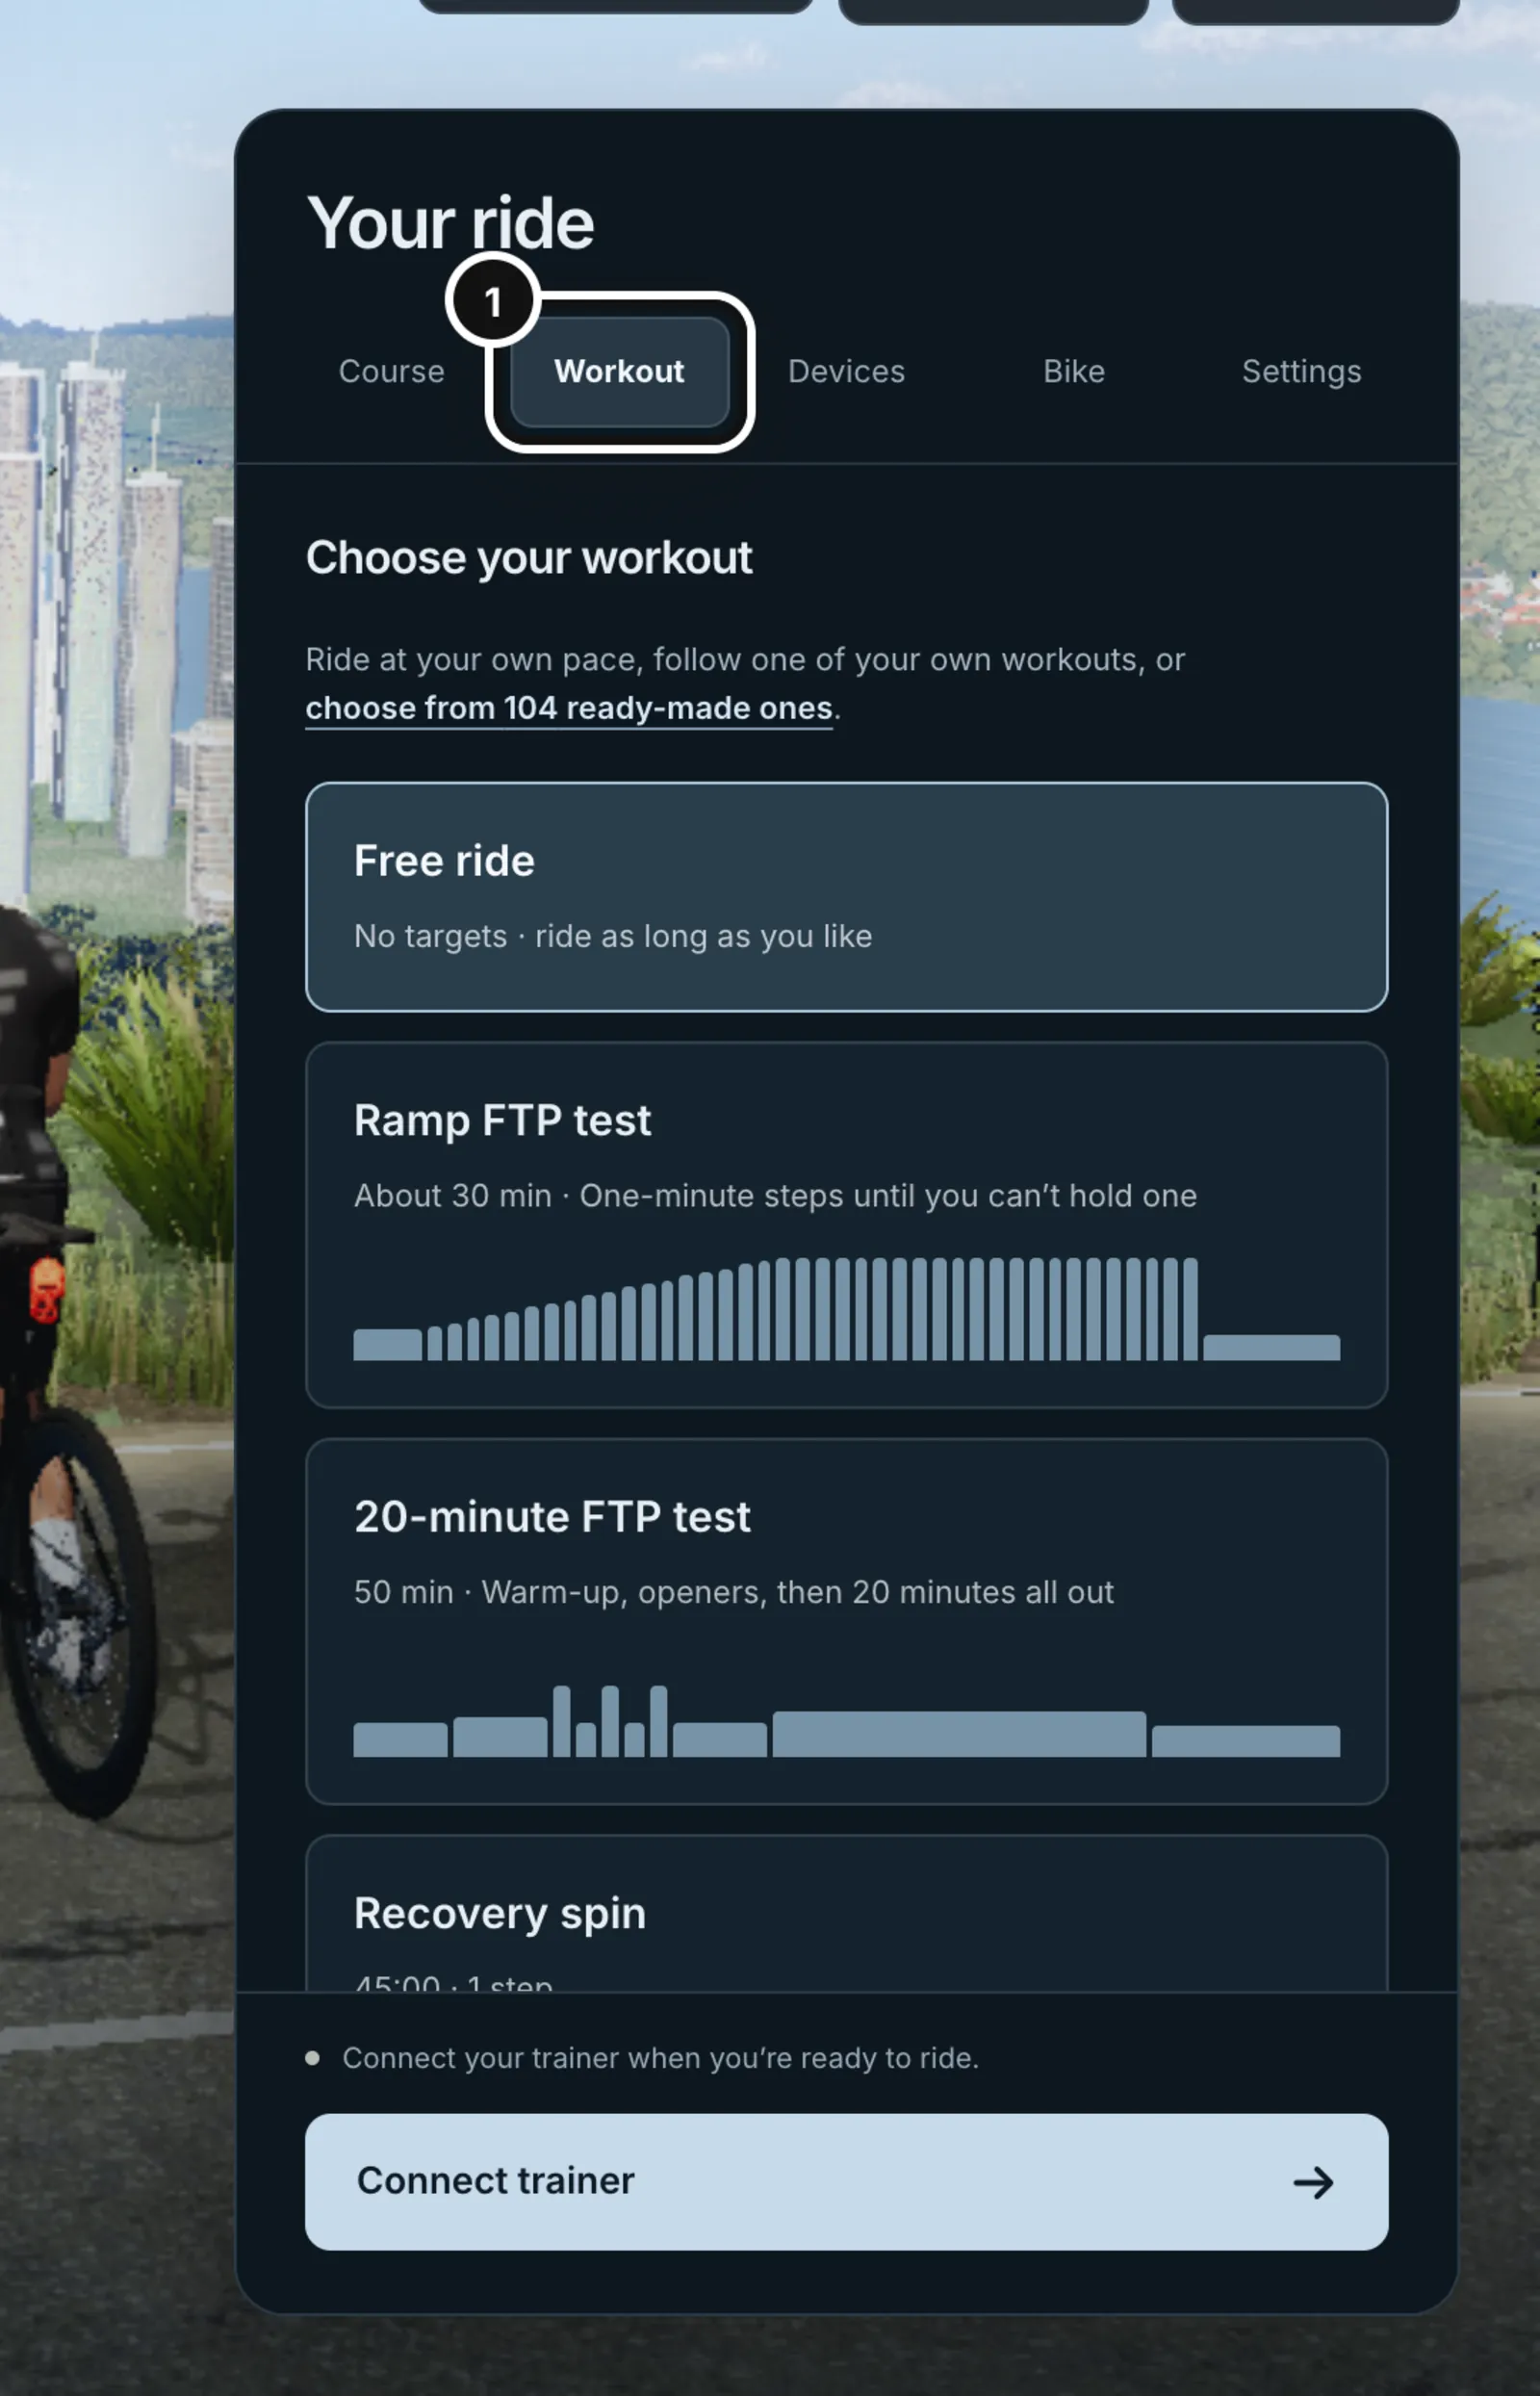
- Free ride: no targets. Ride as long as you like. Form gives road-like resistance that follows the course gradient, and you change difficulty with virtual gears.
- Your own workouts: anything in your workout library, including workouts you saved from the coach. Rides only; run, swim and gym workouts do not show here.
- A planned ride from your calendar: opening it with Ride in the trainer from the session panel puts it first in the list.
- Ready-made rides from Form: 104 of them, listed under “Ready-made workouts”, in ten categories.
- Two FTP tests, which sit beside Free ride (see “Take an FTP test”).
Where to find it
Open the trainer from the Free ride button on the Activities page, the Free ride button on the Workouts page, Ride this workout on one of your saved rides in the Workouts page, or Ride in the trainer on a planned ride in the calendar. The lobby’s Workout tab is where you choose.
Choose a workout
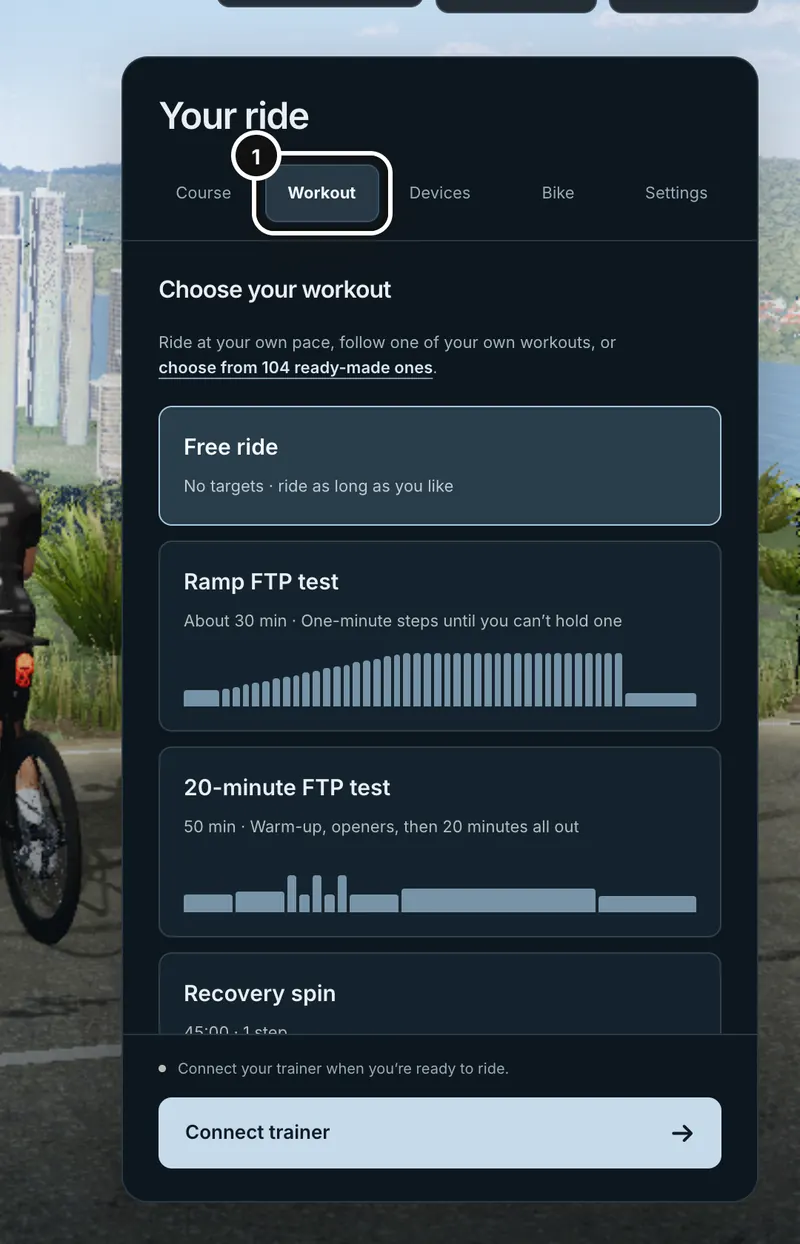
1In the trainer lobby, open the Workout tab. Free ride, the two FTP tests and your own workouts are listed first.
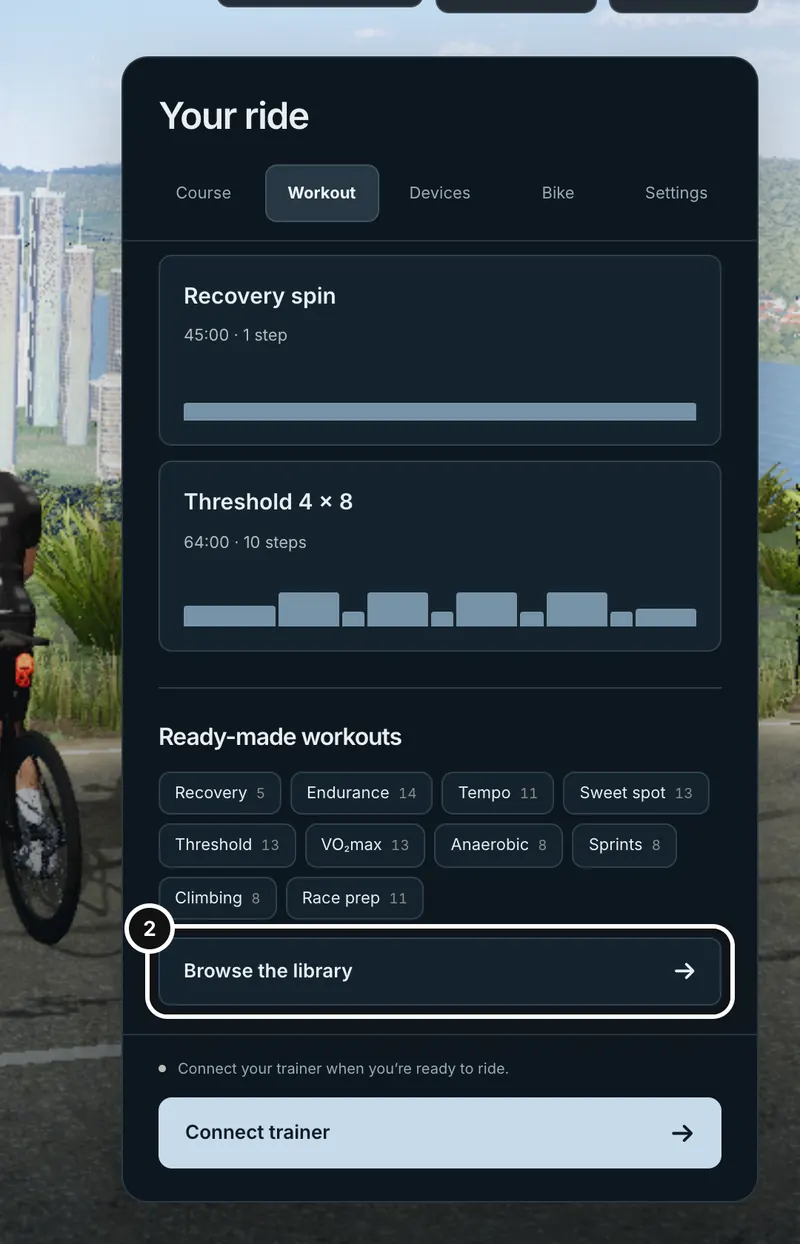
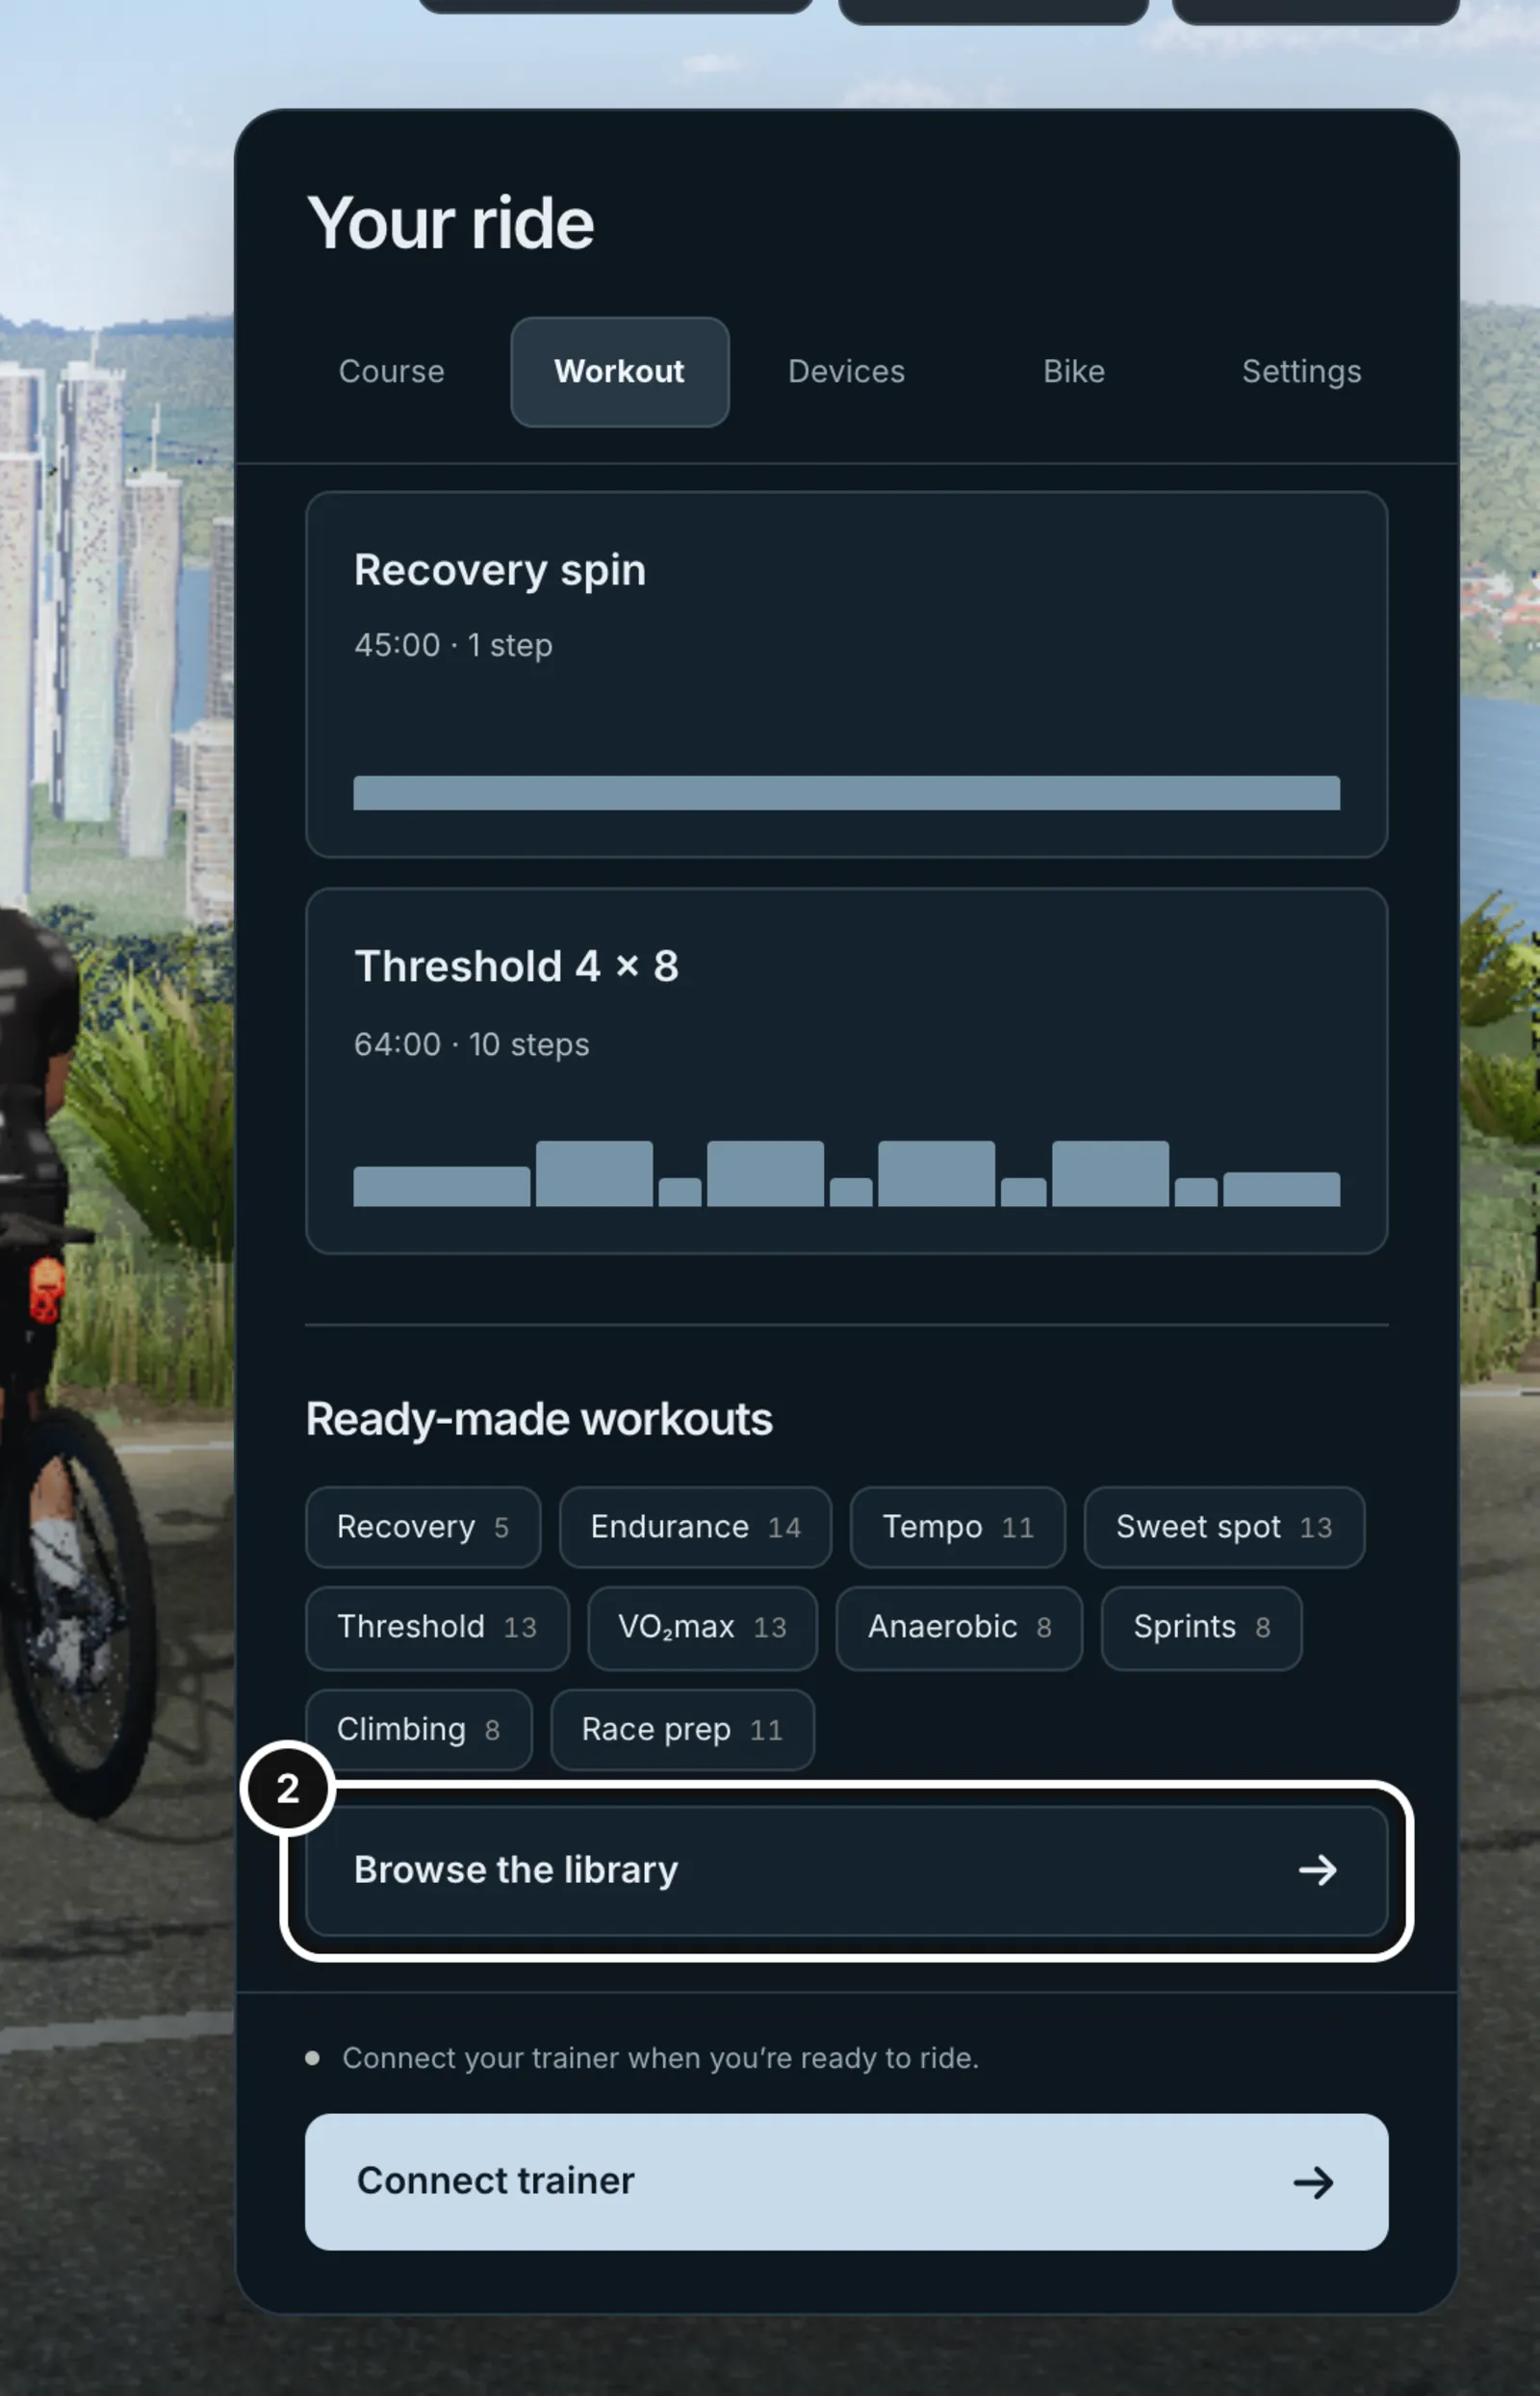
2Scroll to Ready-made workouts. Press a category to open the library there, or press Browse the library.
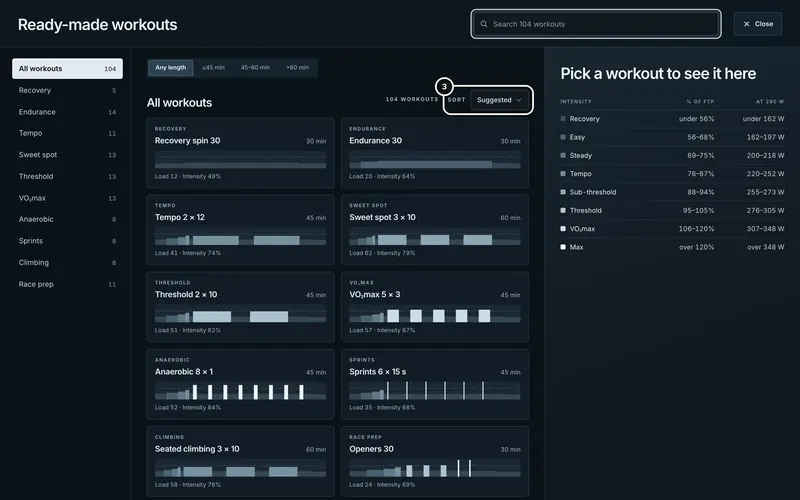
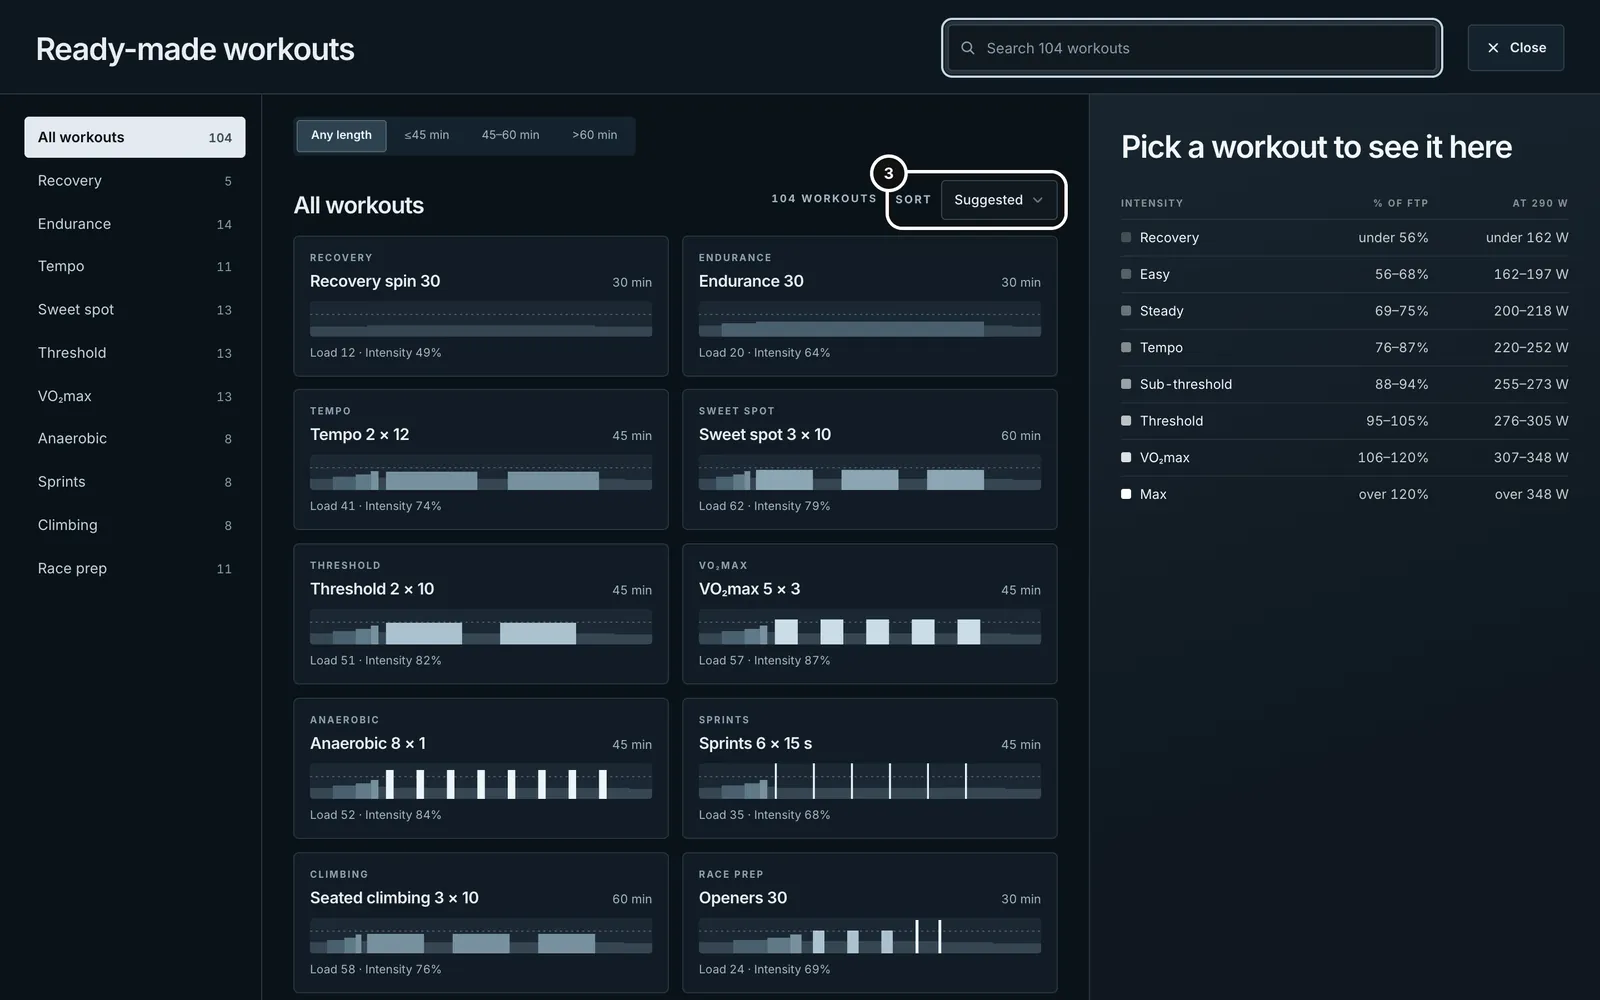
3The library opens full screen: categories down the left, cards in the middle. Filter by length, search, or change the sort.
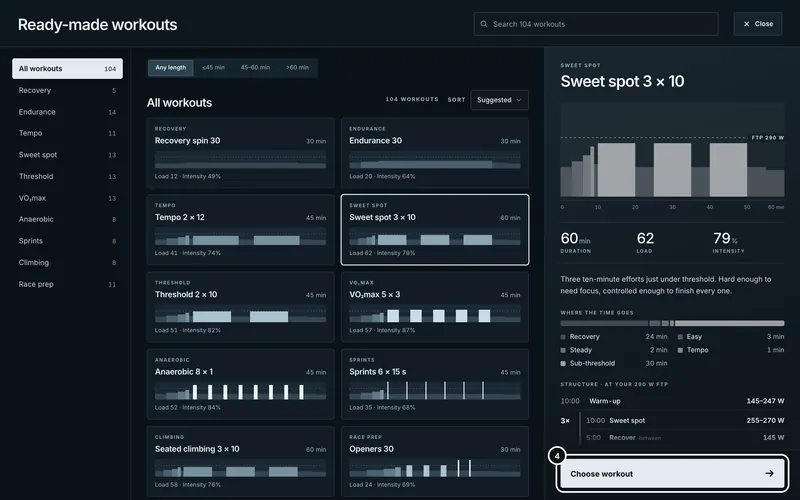
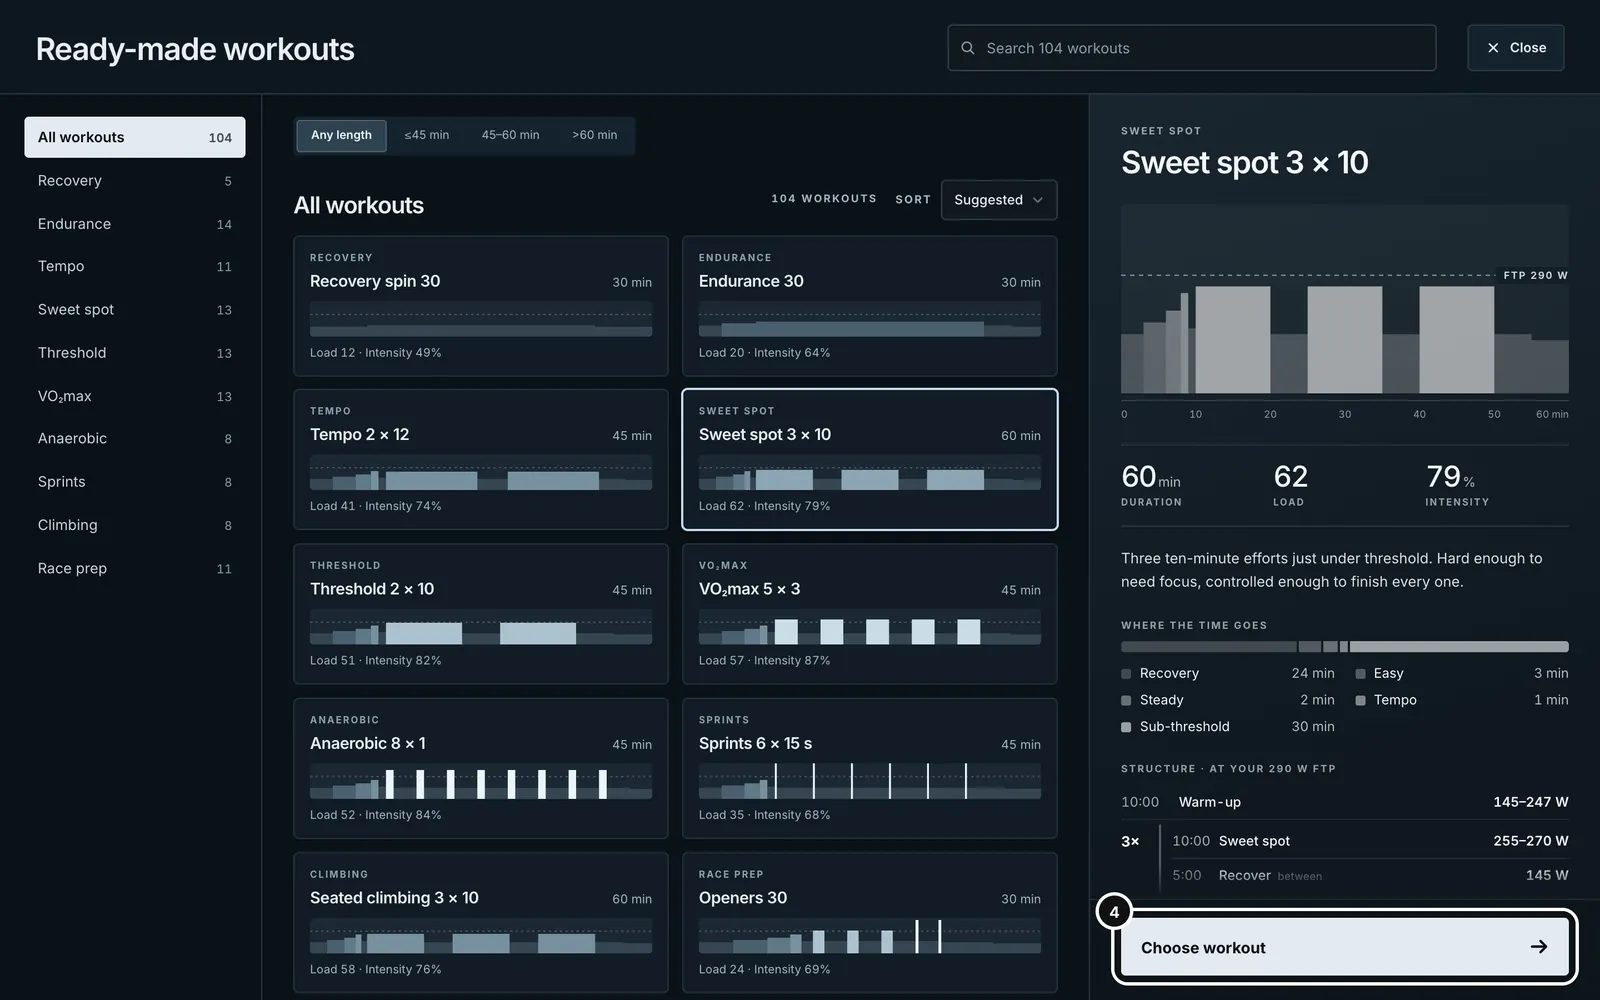
4Select a card to see its profile and structure. Press Choose workout to ride it.
The ready-made library
Every ready-made workout is written by Form and is between 30 and 90 minutes. Each one is a list of steps with a power target as a percentage of your FTP, so the same workout fits every rider. The library shows your watts in the detail panel once your FTP is known.
- Categories: Recovery, Endurance, Tempo, Sweet spot, Threshold, VO2max, Anaerobic, Sprints, Climbing and Race prep.
- Filters: Any length, up to 45 minutes, 45 to 60 minutes, or over 60 minutes; a search box across all 104; and a Sort menu with Suggested, Shortest, Longest, Lightest and Hardest.
- Fits your method: if you chose a training method on your profile, a switch shows only workouts that match the intensities your method uses. Without a method, there is no filter.
- The detail panel: a large profile with your FTP line, duration, load and intensity, where the time goes by intensity band, the structure in watts, and a short explanation of how it fits your method. Pointing at the profile shows the step under it.
- Looking at a card never changes your ride. Only Choose workout does. A chosen workout shows a Chosen badge in the lobby, with a Change button to reopen the library.
Load and intensity are worked out from the steps. Load is hours times intensity squared times 100, so an hour at your FTP is 100. Intensity is the weighted average power of the workout as a share of FTP. These are Form’s own numbers and are shown as Load and Intensity.
Start and ride
- Choose your course on the Course tab and your workout on the Workout tab. The lobby’s bottom button says Connect trainer until the trainer is connected, then Start ride.
- Press Start ride, then begin pedalling. The button reads “Waiting for power · Pedal to begin” until Form sees power, and the clock does not start before that.
- On a workout, the trainer sets each step’s watt target. When a step has no watt target (for example a step set by feel), Form says so and the trainer holds a free resistance; choose an easy gear.
- On a free ride, resistance follows the road. Use virtual gears to make it easier or harder.
- When the last step ends the workout is complete. You can keep riding the course, or finish.
On a trainer that cannot take resistance commands, the ride still works: Form shows the target and you hold it yourself. If your phone is paired as the bike computer, its Road and Watts buttons switch a free ride between road-like resistance and holding a set wattage.
During the ride
The ride screen shows your power, cadence, heart rate, speed, the course, and the workout’s current step with a countdown. Three buttons sit on the screen:
- Ride menu: pauses the ride and opens the menu (below).
- Aero on or off: switches the aero position camera and its panel.
- Finish ride: pauses and opens the Finish your ride panel.
During an FTP ramp, an End test button sits beside them. When a ride is paused, a Resume ride button appears.
Pausing
Open the Ride menu to pause; the workout clock stops while you are paused. With auto-pause on (Settings tab, “Auto-pause when stopped”), the ride pauses when you stop pedalling and the button reads “Auto-paused · Pedal to resume”. If the trainer or a power reading drops out for long enough, Form pauses too, and long gaps are not credited as riding time. After a pause that came from a lost connection, Form wants fresh readings before it sends the trainer new commands.
The ride menu
- A session guide that asks how this part of the session is feeling, with options such as Comfortable, Harder than intended and Short of time. It is a check-in; it does not change your targets.
- Segment results: your times on any timed climbs or sprints you have ridden so far.
- Connected devices and Phone computer: reconnect equipment or show the QR code for the phone bike computer.
- Auto-pause, eat and drink reminders and the aero camera.
- Ride data: live power and heart-rate charts.
- Ride setup: back to the lobby to change course or workout. Exit ride: leave the ride.
Finish and save
- Press Finish ride. The menu opens with the title Finish your ride and the clock paused.
- Optionally rate it: How hard (1 to 10) and How you felt (Great, Good, OK, Hard, Rough).
- Press Save to Form. The ride is uploaded and the panel changes to Ride saved, with Done and View activity.
- Or press Finish without saving. Form asks you to confirm and removes the recording from your browser.
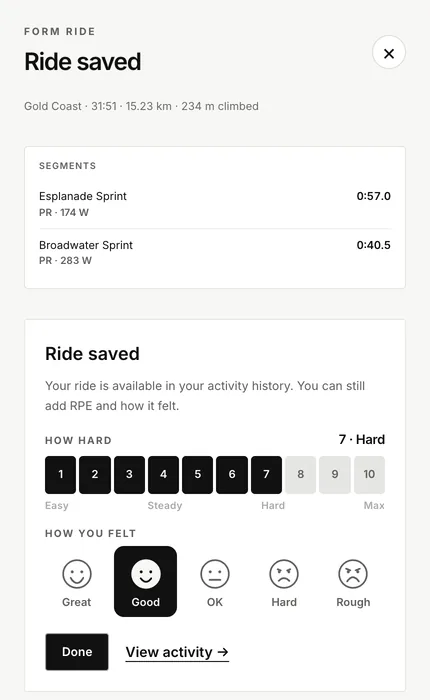
Once saved, you can still add your effort rating and how it felt, and a Send to Strava button appears (see “Send a session to Strava”). The saved ride appears on your Activities page as a bike session, with power, heart rate, laps and segment times, and the coach can read it. If you also record on a watch, finish without saving so the ride is not counted twice. When both exist, Form keeps its own recording and the synced copy is skipped.
When something goes wrong
- You are offline or the upload fails: the ride stays stored on your device and the panel says “Ride saved on this device”. Keep the trainer page open while Form retries, or reopen it later and use Retry upload or Retry save to Form.
- You closed the page mid-ride: the next time you open the trainer, a card says “An unsaved ride is waiting”. Recover ride reopens it paused, with the trainer disconnected; reconnect and continue, or Discard stored ride.
- “This ride has no recovery copy”: your browser could not store the draft. Keep the workout open and save, or close and lose the unsaved recording.
- The course finished before you did: “Course complete. Save your ride, or choose another course.”
- The ride view fails to load: “The ride view could not open.” Your controls are still in the ride menu; press Retry ride view.
- Back button: pressing your browser’s Back during a ride does not leave the page. The trainer warns you if the ride is not saved.
Common questions
- Can I ride without a workout from the coach?
- Yes. Pick Free ride, one of the 104 ready-made workouts, an FTP test, or any ride from your own workout library.
- How do coach workouts get to the trainer?
- Approve the plan so its rides appear on your calendar, open a ride and press Ride in the trainer. A workout you saved to your library is listed in the lobby under your own workouts, and Ride this workout on the Workouts page opens it straight away.
- Where do my rides go?
- Press Save to Form and the ride becomes a session on your Activities page, with power, heart rate, laps and any segment times.
- Why is my ready-made workout greyed out?
- The workout is a percentage of your FTP and your profile has none. Set an FTP in your profile or take the ramp test first.
- What is the difference between Finish without saving and just closing the page?
- Closing the page leaves a recoverable draft on your device. Finish without saving removes it for good, after you confirm.