
Set up the trainer
What you need, how to connect a smart trainer, and the courses you can ride.
Updated 4 November 2026
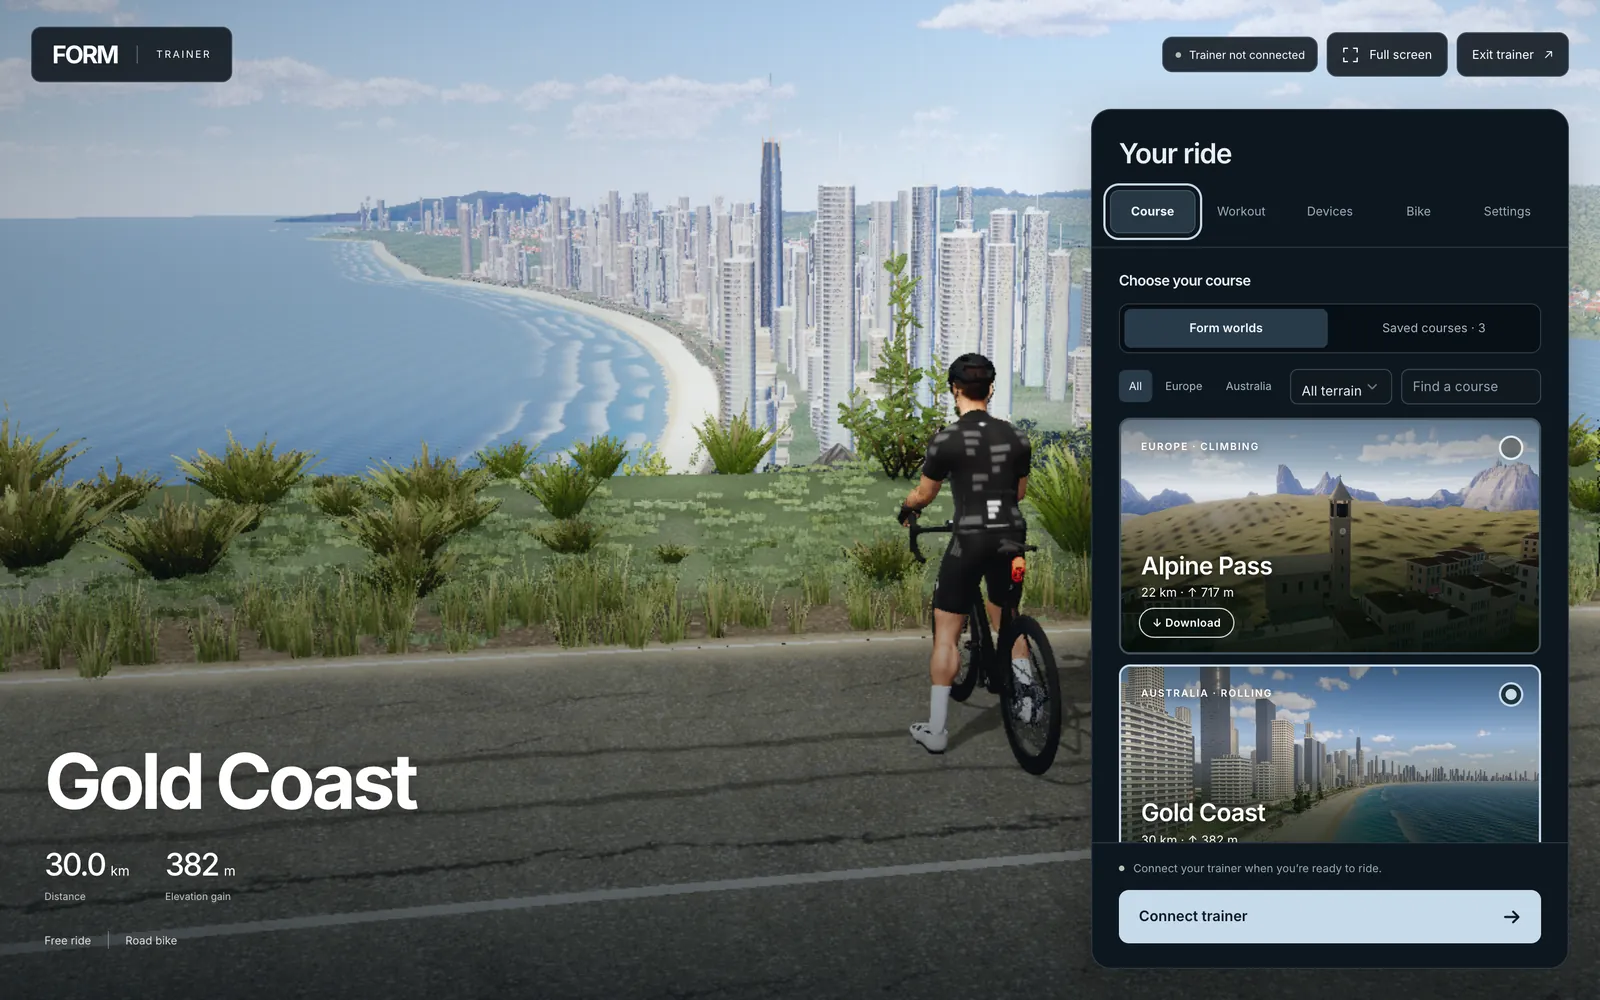
The Form trainer runs in your browser. It pairs with a Bluetooth smart trainer, then lets you ride a structured workout or a free ride through a 3D course while Form sets the resistance. This article covers what you need, how to get to the trainer, what each tab in the lobby does, and what to do when something will not connect.
What you need
- A laptop or desktop with Chrome or Edge. The trainer talks to your equipment through Web Bluetooth, which only Chromium-based browsers offer. In Safari or Firefox the Trainer tile on the Devices tab says “Bluetooth needs Chrome or Edge” and nothing can be paired. You can still look around the lobby.
- A Bluetooth smart trainer that uses the standard fitness-machine protocol (FTMS), which most recent trainers do. Form asks the trainer for control of its resistance. If the trainer only sends readings, you can still ride: Form shows the target and you adjust resistance yourself.
- Optional: a Bluetooth heart-rate strap, and a pedal or crank power meter. Both pair separately.
- A Form account that is signed in. A ride can only be saved to your training history while you are signed in and online.
Where to find it
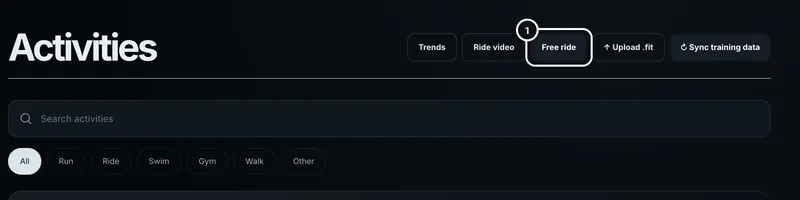
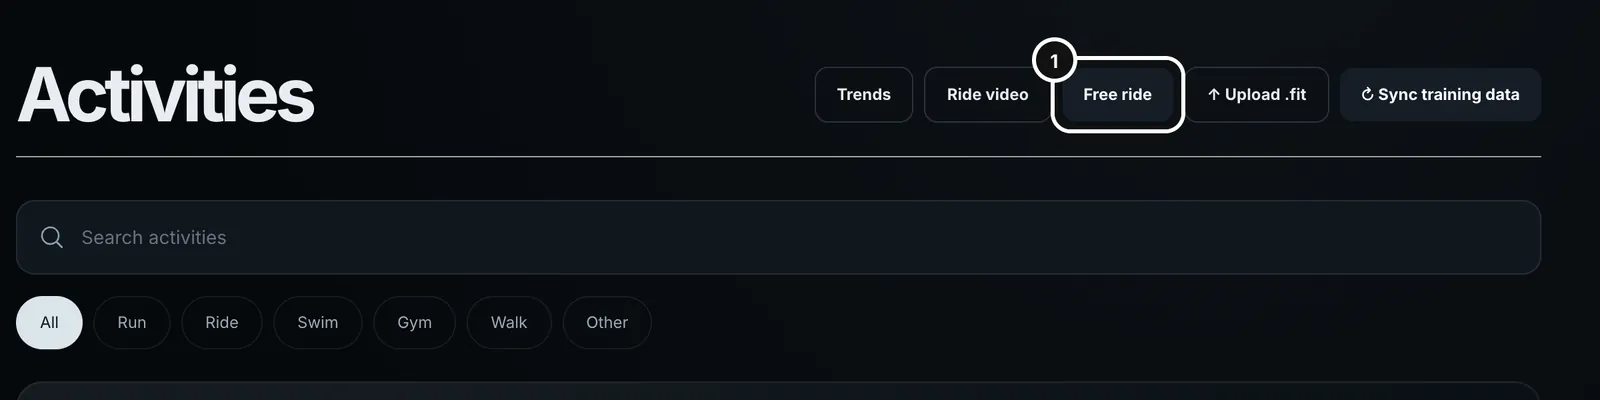
The trainer is its own full-screen page at /trainer. The quickest way in is the Free ride button at the top of the Activities page. You can also reach it from the Workouts page (its Free ride and FTP test buttons, or Ride this workout on one of your saved rides), or from a planned ride on your calendar, where the session panel has a Ride in the trainer button. Exit trainer in the top right takes you back.
Open the trainer
1On the Activities page, press Free ride.
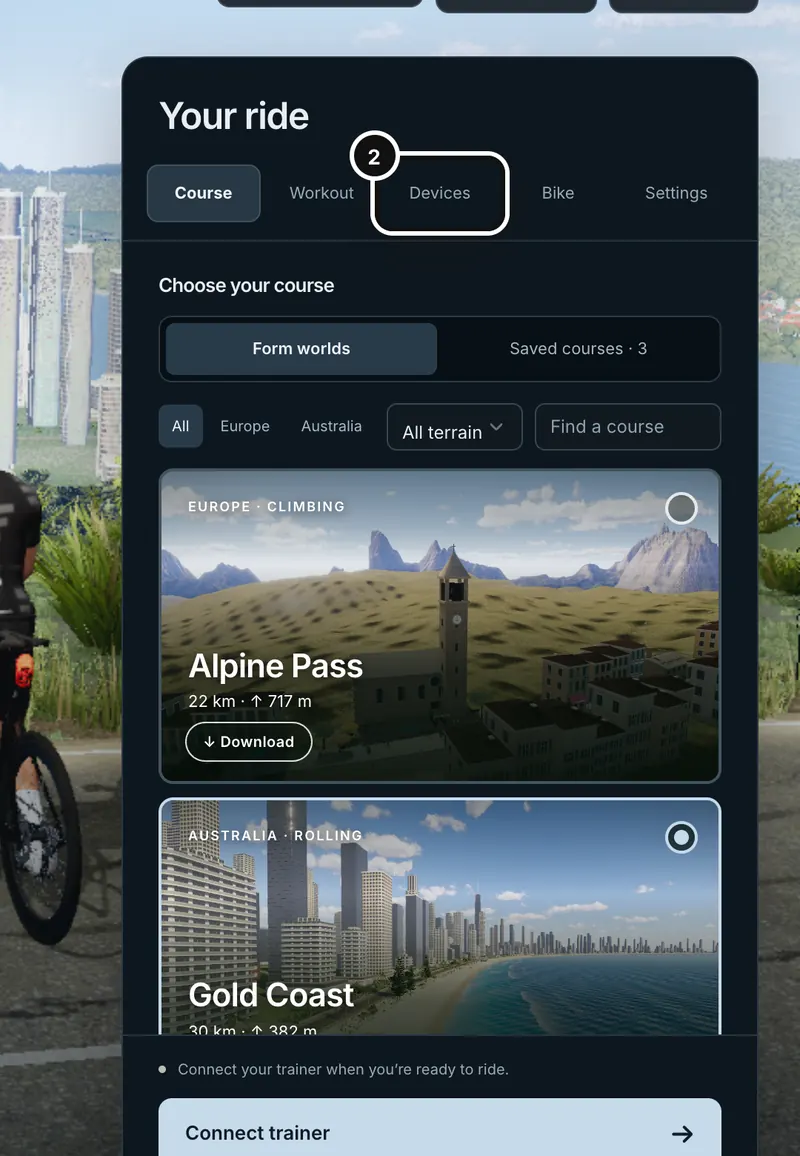
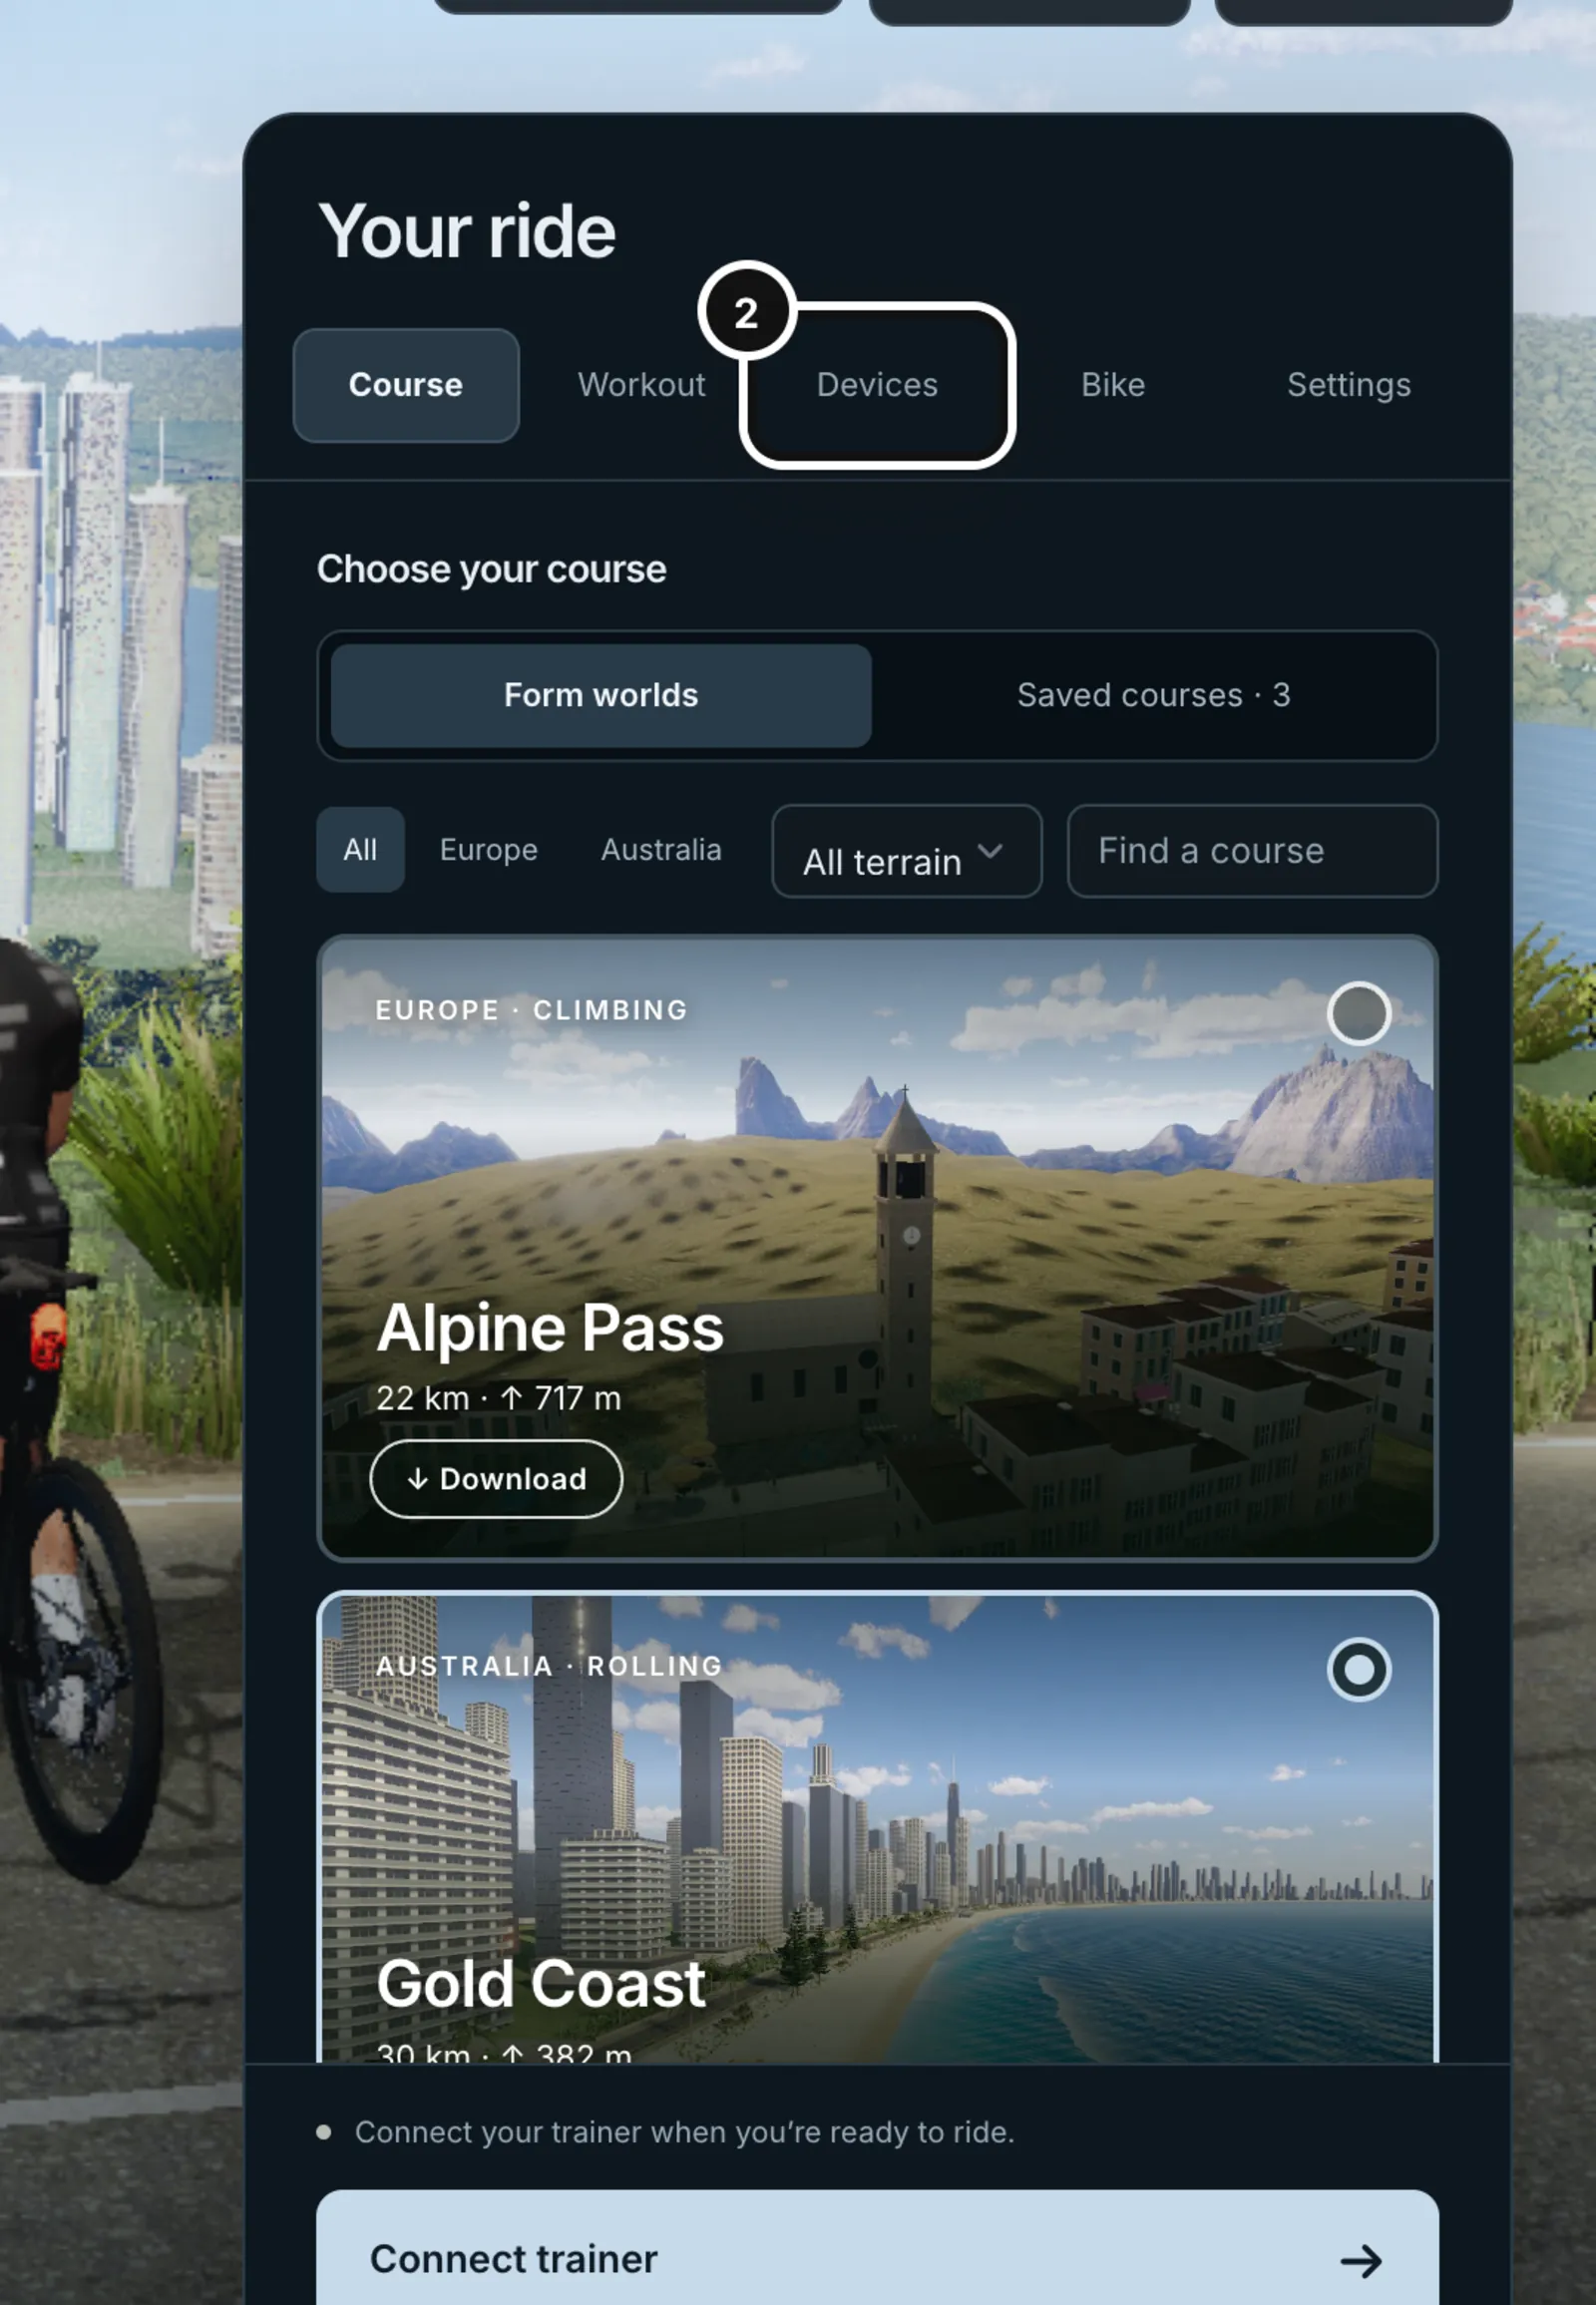
2The lobby opens on the Course tab. Open the Devices tab.
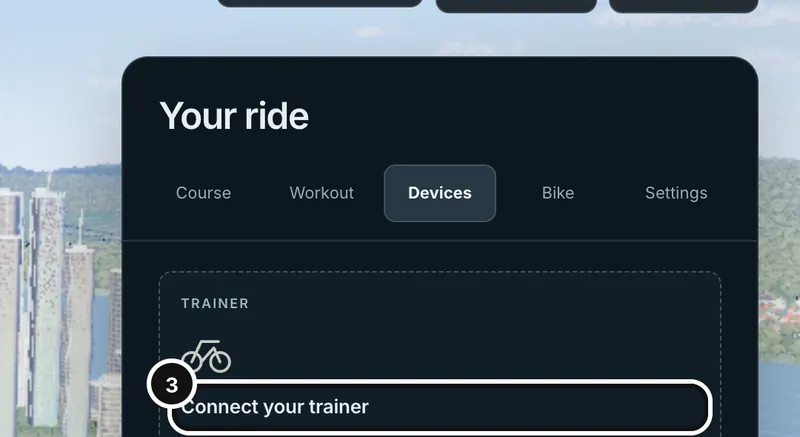
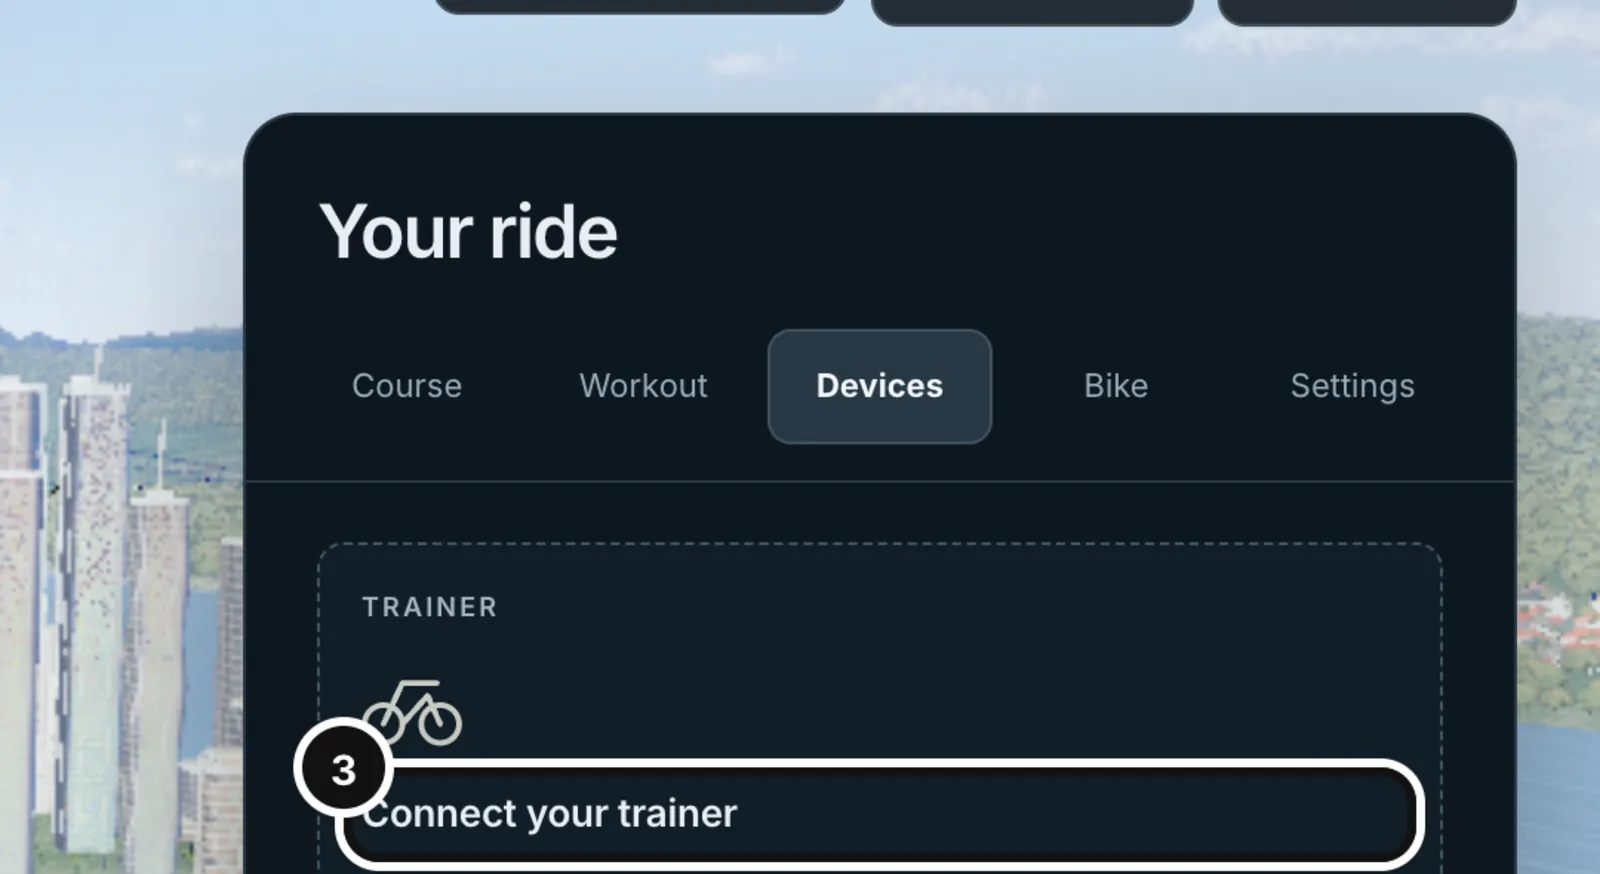
3Press Connect your trainer in the Trainer tile (or the Connect trainer button at the bottom of the panel) and choose your trainer from your browser’s list.
Pair your trainer, step by step
- Wake the trainer by pedalling or by plugging it in, and close any other app that holds its Bluetooth connection. Most trainers accept only one connection at a time, so a phone app or another browser tab that is already connected will hide it from Form.
- On the Devices tab, press the Trainer tile. The button at the bottom of the lobby also reads Connect trainer until one is connected.
- The first time, Form asks “Connect a Bluetooth trainer?” and explains what it will use the trainer for. Press Continue to device selection.
- Your browser shows a list of nearby compatible trainers. Choose yours. The list is the browser’s own, not Form’s.
- When it connects, the tile shows live watts and cadence and the top bar of the lobby changes from “Trainer not connected” to your trainer’s name. The bottom button becomes Start ride.
- Optional: press the Heart rate tile and choose your strap, then the Power meter tile and choose your meter.
Next time, the Trainer tile offers Reconnect with your trainer’s name, which skips the question, and Choose a different trainer if you have a new one.
The Devices tab
- Trainer: required to ride. Form reads power, cadence and speed from it. If the trainer allows it, Form also sets the resistance: watt targets for a workout, and road-like resistance that follows the course gradient on a free ride. If it does not allow control, the tile says “Readings only. Adjust resistance on your trainer.”
- Heart rate: any Bluetooth heart-rate monitor. Optional.
- Power meter: a Bluetooth pedal or crank meter. Optional. Once connected, you can choose “Use this for power” so the ride’s watts come from the meter while the trainer still sets resistance. “Use the trainer for power” switches back.
- Virtual gears: on a trainer that takes resistance control, gears 1 to 24 change how hard the road feels. You shift on screen, from the keyboard, or with a compatible Bluetooth shifter. The tile reads “Needs a trainer with resistance control” until such a trainer is connected.
- Phone computer: the QR code that pairs your phone as the bike computer. It is on this tab too (see “Use your phone as the bike computer”).
A power meter alone is enough to ride. With no trainer connected, Form uses the meter for watts and says “Power meter · virtual gears need a smart trainer. Adjust resistance on the bike.” If your trainer drops out mid-ride, Form pauses and keeps reading the meter.
Connect automatically next time
Chrome and Edge normally forget a Bluetooth device when you close the page, so connecting opens the browser’s list each time. The Devices tab has a Connect automatically next time section. It shows a browser address to paste into a new tab and the setting to switch to Enabled, then asks you to relaunch the browser and connect each device once more. After that, your trainer, strap and meter reconnect by themselves when they wake up. This is optional and is a browser setting, not a Form one.
The lobby tabs
The Your ride panel has five tabs. The bottom button is always the next step: Connect trainer, then Start ride.
- Course: choose where to ride, and see the timed segments on it.
- Workout: choose what to ride. See “Ride a workout on the trainer”.
- Devices: pair equipment, shifting and the phone computer.
- Bike: choose Road bike or Triathlon bike for your rider, and set your rider weight.
- Settings: auto-pause, eat and drink reminders, the aero position camera, advanced ride settings and an offline download.
Courses
Three Form courses are ready to ride:
- Gold Coast: a 30 km loop from the Surfers Paradise esplanade with 382 m of climbing.
- Alpine Pass: a 22 km climb through eight hairpins to a ridge, 717 m of ascent, then a descent.
- Ubud Rainforest: a 15.6 km loop through Ubud, Bali, with 152 m of climbing.
The Course tab has two views. Form worlds are the courses above, with filters for region (All, Europe, Australia), terrain and a Find a course box. Saved courses are the GPX routes you imported on the Courses page; until you have some it says “No saved courses yet”, with Manage courses to go and add one. A course card’s Download button stores that course in your browser so it opens in seconds on later rides; riding works without it, the first load is just slower.
Segments and your records
Below the courses, Segments lists the timed sprints and climbs on the course you have selected, each with where it starts and ends and your best time on it (a dash until you have ridden it). Your times are kept between rides as personal bests: there is no leaderboard, and nobody else sees them.
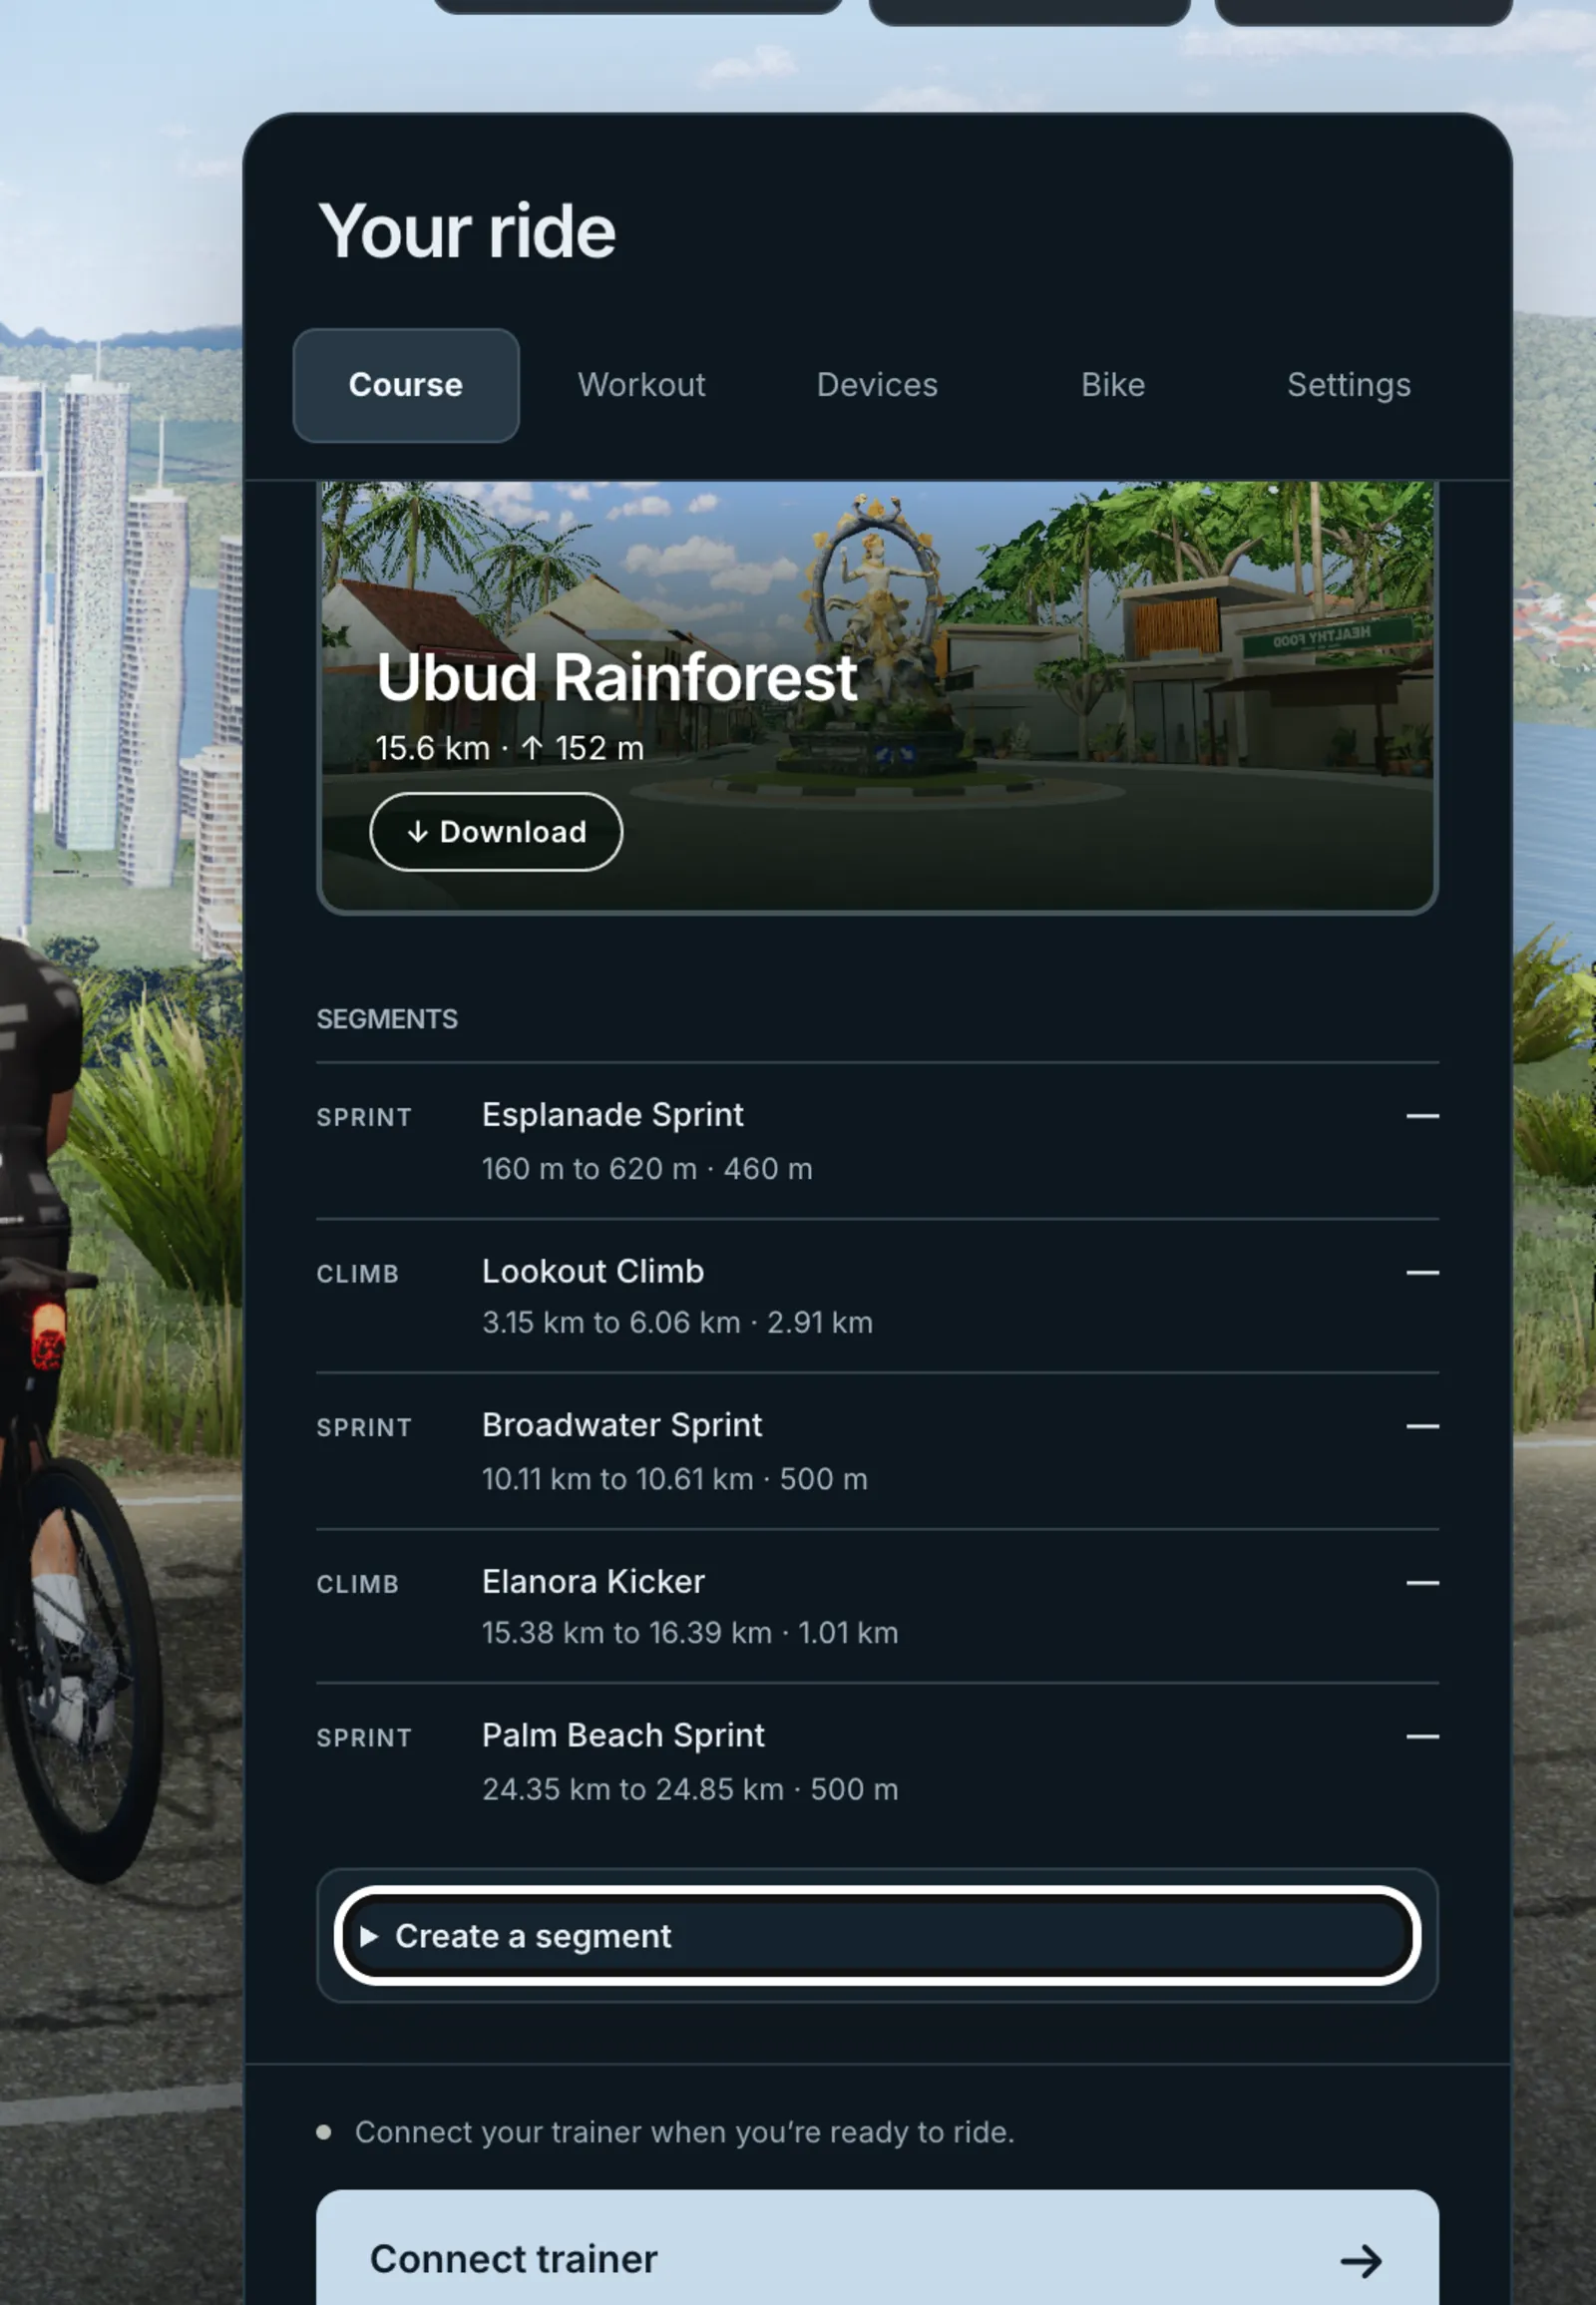
To time a stretch of your own, open Create a segment. Drag Start and Finish along the course profile; Form shows the length, the rise and the average gradient as you go. A segment can be 50 m to 10 km. Give it a name and press Save segment. Your own segments are marked Yours in the list, and you can rename or delete them there. Deleting one also deletes its saved efforts, and Form asks first.
Rider weight, bike and FTP
On the Bike tab choose Road bike or Triathlon bike and check the rider weight in kilograms. Weight drives the physics of the ride: how fast you climb for a given power.
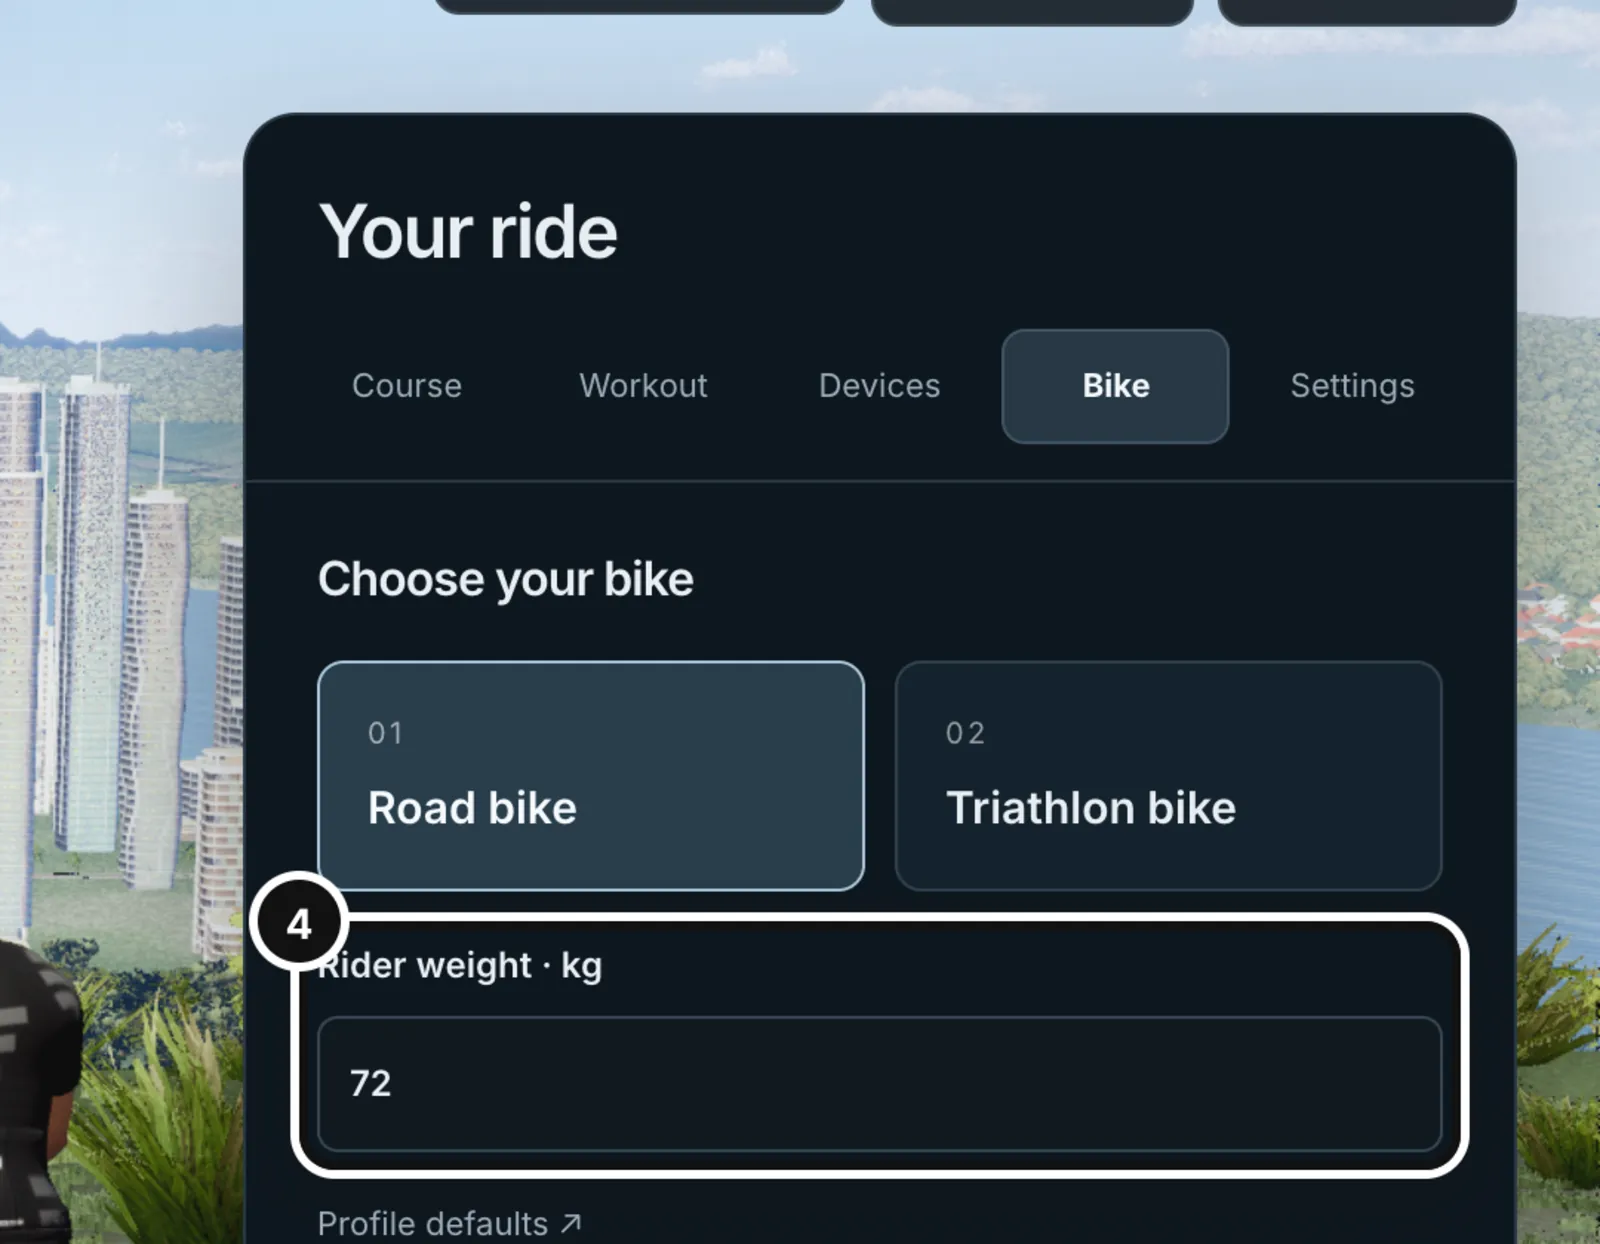
Form takes the weight from your profile if you set one, otherwise from your latest recorded weight, otherwise it uses a 75 kg estimate. You can change the number for this ride on the Bike tab; the Profile defaults link opens your profile in a new tab to change it for good. Your FTP also comes from your profile. Without one, the ready-made workouts cannot be chosen because they have no watts to hold, and the lobby offers the ramp test instead (see “Take an FTP test”).
Settings tab
- Auto-pause when stopped: the ride and workout clock pause when you stop pedalling and resume when you pedal again.
- Eat every 20–45 min and Drink every 15 min: tick either and Form shows a reminder card during longer rides. Ticking Eat also asks for your carbs per gel and carbs per hour; with both filled in, the line reads how often to take a gel, for example “Eat a gel every 20 min”. They are “Reminders you set, not nutrition advice.” A planned workout under an hour gets no eat reminder.
- Aero position camera: a camera angle with its own controls.
- Advanced ride settings: wind (changing or fixed, with speed and direction), rider weight, bike weight, aerodynamic area, rolling resistance. Defaults are sensible; change them only if you know what you are matching.
- Ride without internet: Download for offline stores the selected course and ride so the trainer can open without a connection. Saving a finished ride still needs internet.
If pairing fails
- The list is empty or your trainer is missing: the trainer is asleep, out of range, or connected to something else. Pedal to wake it, close other apps that hold it (including a phone app, or Form open in another tab), and try again.
- Your browser shows no Bluetooth chooser at all: you are not in Chrome or Edge, Bluetooth is off, or the browser has blocked Bluetooth for the site. Turn Bluetooth on and allow it in the site settings.
- “Connecting to the trainer took too long. Cancel the browser connection and try again.”: the connection stalled after you chose it. Press Cancel connection on the tile, wake the trainer and try again.
- “That device is already connected as your heart-rate monitor. Choose a separate trainer.”: you picked the same device in two roles. Some trainers also broadcast heart rate; choose the trainer under Trainer and a strap under Heart rate.
- “Readings only. Adjust resistance on your trainer.”: the trainer connected but would not give up resistance control. You can ride; Form shows the target and you hold it yourself. Some trainers allow control only when no other app holds it.
- The trainer disconnects mid-ride: Form pauses the ride and says “The trainer disconnected. Reconnect to resume your workout.” Reconnect on the Devices tab (in the ride, open the Ride menu, then Connected devices). Long gaps are not credited as riding time.
If the 3D view is slow to appear
While a course loads, a badge in the top left reads “Loading 3D view” with the step it is on: Building the sky, Placing the scenery, Bringing your rider, then Preparing materials. The lobby shows the course picture meanwhile, and the badge goes when the course is ready. A downloaded course opens faster. If the badge says “3D view unavailable”, press Retry. If your browser is drawing without your graphics card, the badge adds “Your browser is drawing the 3D view without graphics acceleration, so this can take a few minutes and the page won’t respond until it’s ready.” Switch on hardware acceleration in Chrome’s or Edge’s System settings, then reload.
What happens next
Choose a workout and press Start ride. You are in a 3D course with your power, cadence, heart rate and the workout target on screen. The next article, “Ride a workout on the trainer”, covers the controls, pausing, finishing and saving.
Common questions
- Which smart trainers work with Form?
- Bluetooth smart trainers that use the standard fitness-machine protocol (FTMS), which most recent trainers support. If a trainer only sends readings and will not accept resistance commands, you can still ride and follow the target yourself.
- Do I need to install anything?
- No. The trainer runs in Chrome or Edge on your laptop or desktop. Nothing is installed. Your phone can act as the bike computer through a web page.
- Can I use a power meter without a smart trainer?
- Yes. Pair the meter on the Devices tab and Form takes your watts from it. Virtual gears and automatic resistance need a smart trainer, so you adjust resistance on the bike.
- Can I ride without internet?
- A ride that is already loaded keeps going if your connection drops, and Settings has a Ride without internet download for opening the trainer offline. Signing in, new downloads, cloud coaching and saving a finished ride need a connection; an unsaved ride stays on your device until you are back online.
- Which courses can I ride?
- Gold Coast, Alpine Pass and Ubud Rainforest, plus any GPX course you have saved on the Courses page.
- Are the segment records shared?
- No. They are your own personal bests, on Form’s segments and on any you create. Form has no leaderboard.
- Can I make my own segment?
- Yes. On the Course tab, open Create a segment under the segment list, drag the start and finish, name it and press Save segment.